/ ブログ / ロングライトニュース / 分子生物学イメージングシステム:ゲルとブロットに適したプラットフォームの選択

分子生物学イメージングシステム:ゲルとブロットに適したプラットフォームの選択

2026-07-31

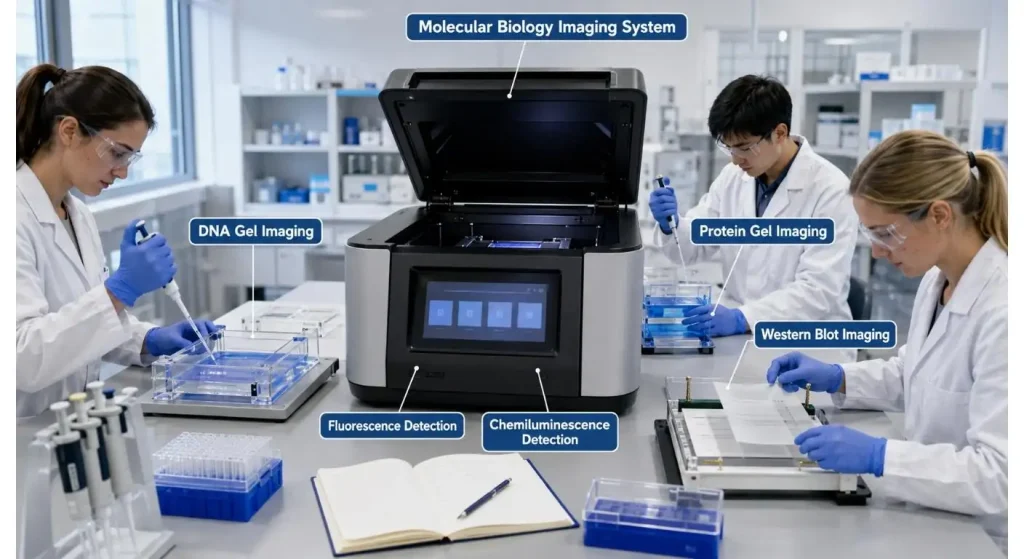
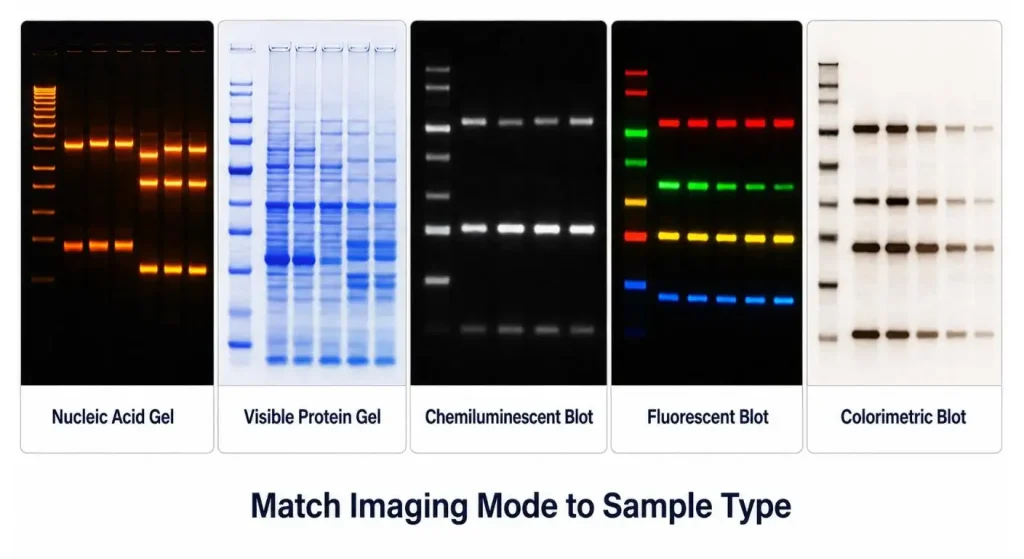
A molecular biology imaging system provides a digitalized output of a gel or membrane that can be viewed, quantified, stored and compared. It can be set up to scan gels containing DNA and RNA, stained protein gels, chemiluminescent Western blots, fluorescent blots, and colorimetric samples.

A system should be used to fit the assay and not the other way around.

How does a Molecular Biology Imaging System work?

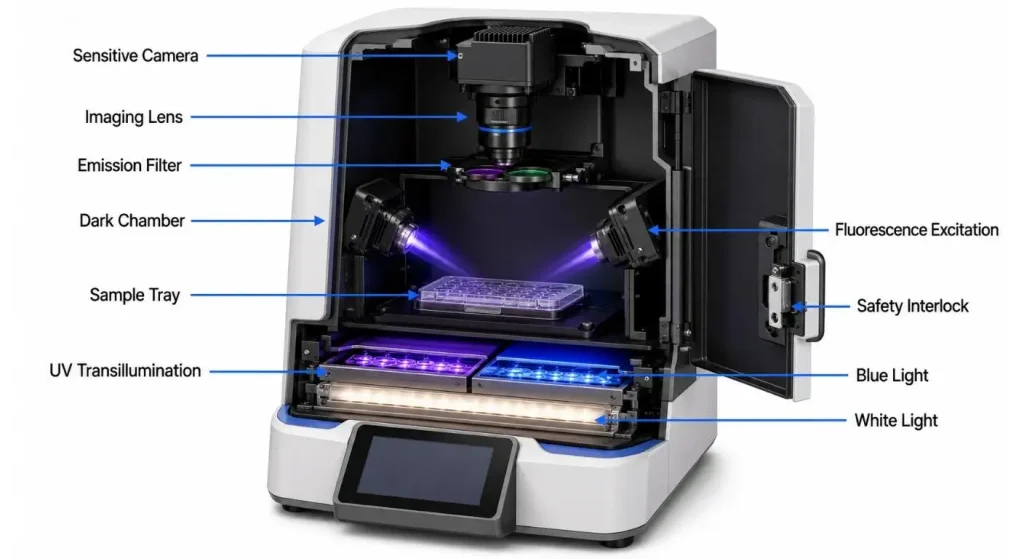
A standard imaging system would include a light tight chamber, camera, lens, sample stage, sources of light that can be used for the desired excitation, filters that allow it to pass only light with a certain frequency of emission, software for the camera to record the image, and software for analyzing the image.

In the case of nucleic-acid gels, the instrument shines UV, blue or other appropriate light on a fluorescent stain. White light is frequently used for protein gels which are visible. The light produced in chemiluminescent Western blots is of their own making and comes from a chemical reaction, so there is a need for a sensitive camera and a dark imaging chamber, but not a high intensity of light on the sample.

Some all-in-one platforms have the capabilities of gel documentation, colorimetric imaging, chemiluminescence and fluorescence in one enclosure. For instance, bio-Rad provides systems to image nucleic-acid and protein gels and chemiluminescent blots, and the systems can be expanded with a visible channel, far-red, and near-infrared fluorescent channels.

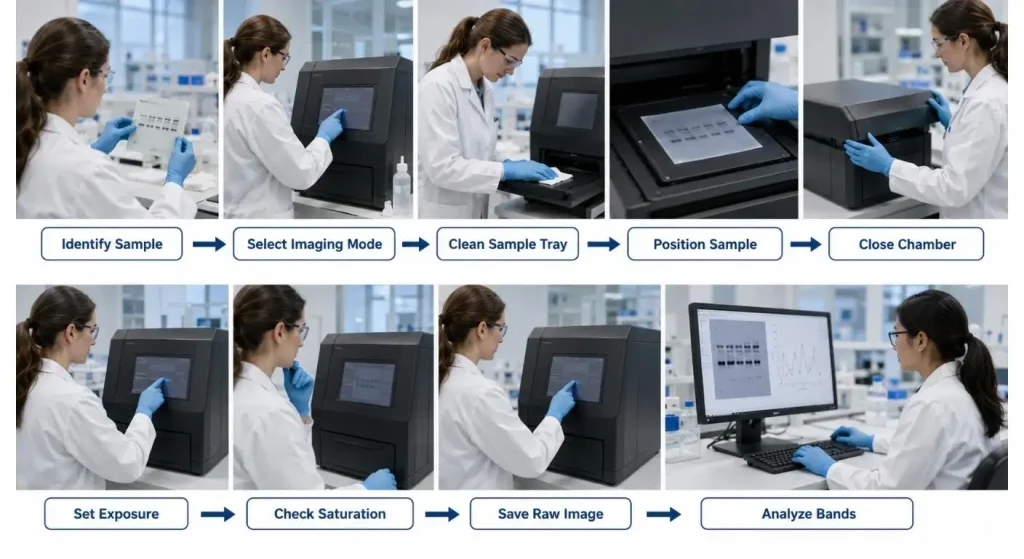
You can start with the samples that you do run

The first place to start is on the lab bench--not on the specification sheet!

For a teaching laboratory with a primary focus on agarose gels, UV, blue-light and white-light imaging might be the only types required. An accurate protein research lab requires delicate chemiluminescence and a number of fluorescent channels.

Selection FactorWhy It MattersWhat to Confirm
サンプルの種類Determines required imaging modesGels, blots or both
Detection methodDefines the light source and camera needsVisible, fluorescence or chemiluminescence
Excitation channelsControls stain and fluorophore compatibilitySupported wavelengths
Dynamic rangeHelps capture weak and strong bandsSaturation control
Field of viewDetermines supported sample sizeLargest gel or membrane
Imaging softwareAffects acquisition and analysisBand analysis and raw-data export
Safety designReduces UV and light exposureEnclosed chamber and interlock

Thermo Fisher divides its visualization systems into those that provide simply visualization and those that provide software analysis as well as chemiluminescent Western blot and multichannel fluorescent imaging. A handy reminder: gel documentation system is not necessarily a level of instrument as multimode molecular imager.

Match the excitation source and the filter to the stain

Each fluorescent dye has an optimum range of wavelengths for its illumination and for the emission of the light. The imaging system must be equipped with an appropriate light source to excite the dye, and with an emission filter that lets the emission (fluorescence) photons reach the camera while rejecting the light used to excite the dye.

The following are examples of systems that can contain:

  • UV transillumination
  • Blue-light transillumination
  • White transmitted light
  • White reflected light
  • Visible fluorescent excitation
  • Near-infrared fluorescent excitation

There is no correlation between the number of light source and its quality. The key is if the wavelengths and filters installed are compatible with the stains, antibodies and fluorescent labels that are already used in the lab.

Check the reagent list for the laboratory before buying a system to make sure it is supported by the applications. Please be aware that not all fluorescent dyes can be captured because the system is referred to as a "fluorescence imager.

Chemiluminescence and Fluorescence, are very similar

In chemiluminescent western blotting the light is generated by a chemiluminescent reaction which is usually based on an antibody-enzyme and a luminescent substrate. The signal will change with time – imaging should be started within the range of working time recommended for the reagent.

Western blotting done by fluorescent requires the external light of the excitation. It can be used to multiplex experiments, thus multiple targets can be detected on the same membrane via different fluorescent channels.

Chemiluminescence is generally employed for the sensitive and routine detection. When multiplexing or stable signal capture or quantitative comparison are crucial, fluorescence is often chosen. There is no single best method, as it will depend on the requirements of the assay, the amount of target, the antibodies, the labels used and the analysis aims.

If a laboratory is routinely conducting both tests, it should ensure that the proposed system will allow for the tests to be run both as is and without involvement of complex hardware changes.

When photographing, consider dynamic range and saturation

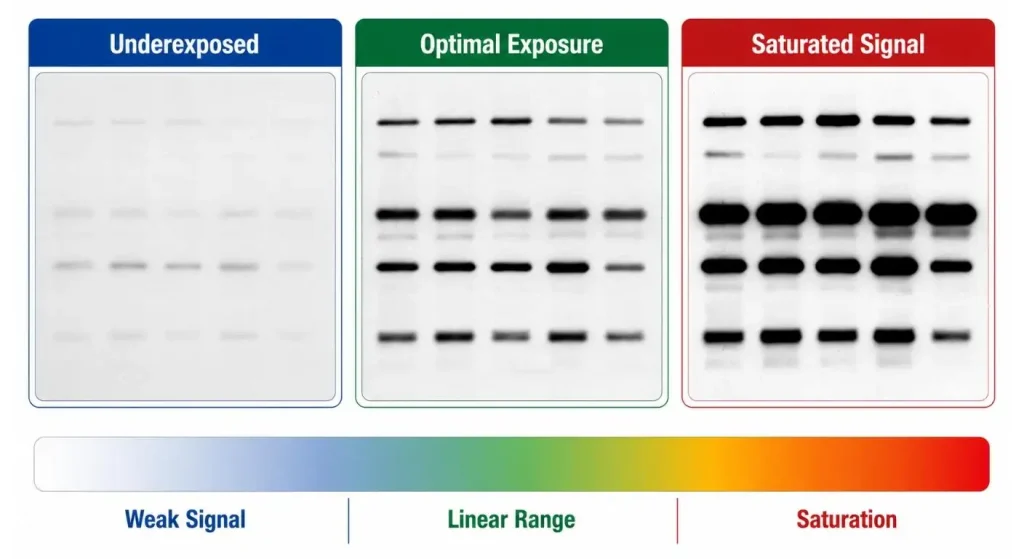
Some blot may have one very strong band, and a number of weak bands. The strong band might become saturated if the exposure would be long enough to show the faint signals.

When there is so much light that the camera's pixels cannot capture anymore. After that point the apparent clarity of the displayed band will be preserved but the level of intensity will not be able to be used for quantitative comparison.

Dynamic range is the range of weak to strong signals that an imaging system is able to record in a single image. A bigger dynamic range allows for easier recording of the faint and intense bands without losing any of the information.

Some imaging platforms can detect saturated pixels, suggest an appropriate exposure or use multiple exposures. They can decrease the number of trial and error imaging, but are not meant to be a substitute for a good experimental design. Even if samples are overloaded, they should still be corrected during the assay phase and antibody signals that are too strong should be corrected as well.

Use of the Automatic Exposure should be avoided

Automatic exposure can be useful if multiple individuals are taking turns on the instrument, or if there are any factors that might make the signal strength hard to gauge.

Some systems will obtain short initial exposures and then will suggest an overall exposure based on that. Light source, focus and application settings are automatically selected by others.

This may allow for routine imaging to be faster, but please check by the operator. Check whether:

  • Note: Saturation is indicated for important bands.
  • Weak bands can be seen on top of the background
  • The whole field of view is covered by the complete sample.
  • For the best results, the correct imaging mode was used.
  • The necessary filter and tray were used
  • The following are quantitative analysis and require the exposure suits:

Automatic settings are a good starting point, but NOT an excuse to not inspect image.

Make sure that the resolution, sensitivity and field of view are all correct

Resolution is important to the image captured by a camera, but the number of megapixels is not an indicator of the imaging quality of a camera.

It is also important to have a useful system that is sufficiently sensitive, has low background, good optics, is uniform and has a sufficiently large field of view to accommodate the gels or membranes used in the laboratory.

If the chemiluminescent signals are weak, a very sensitive camera will be necessary. The greater the distance between bands the less resolution is needed; the less the distance between bands and the more important to have resolution, and the smaller the feature in the sample to be separated the more resolution is needed.

Place the largest lab gel tray, blot or multi-gel tray on the site of imaging prior to purchase. If a large gel is cut up into several images, there is wasted effort and comparisons will be more difficult.

Ensure that images are acquired consistently

It is recommended to take images under the same conditions when comparing images.

Write the imaging mode, the type of light source, the filter, exposure time, binned, focus, sample position, analysis settings, and background and any background correction. If necessary, re-use protocols that are saved.

If staining or destaining, make sure that the conditions are the same for nucleic-acid and protein gels. Control the loading of control samples, the concentration of the antibodies, the time of the substrate and the handling of the membrane in Western blots.

The imager will only be able to record the sample it is put in. It cannot fix uneven transfer, too much background, overloaded lanes or the lack of antibody specificity.

Test the Analysis Software

Common tasks shouldn't be hard to do with image-analysis software, and the software should not obscure the production of the result.

Some nifty functions might be:

  • Lane & band detection
  • Molecular-weight estimation
  • Background subtraction
  • Band-intensity measurement
  • Saturation warnings
  • Normalization
  • Multiplex-channel display
  • Image annotation
  • Data export
  • When the user or the experiment is recorded.

Built-in analysis is an advantage for routine work, and desktop software might be more suitable for detailed analysis as well as for final figure preparation. For example, thermo fisher imaging systems offer onboard acquisition and analysis, and external software workflows.

Keep the original image file as is always as long as you can. To adjust the image displayed should not be replacing the raw acquisition data.

Make sure that you take precautions and take extra steps to ensure that your samples are safe

It is important to provide appropriate shielding since the direct or reflected ultraviolet light emitted by the UV imaging device may cause damage to eyes and skin. Exposure can be reduced by enclosing the imaging chamber which is less compared to open UV light box.

If the DNA is to be extracted from the gel, using blue-light excitation might be better for appropriate nucleic-acid stains. White-light imaging eliminates the use of UV to view the protein stains that are visible.

The system should also be designed to ensure sample to sample contamination is prevented. Wash sample trays, get rid of buffer spills as soon as possible and follow the manufacturer's guidelines for the cleaning of the filters, lenses, and imaging surfaces.

Ensure that the System is set up as an Optical Instrument

The molecular biology imager cannot be cleaned just once in a while.

Light sources wear out over time, filters may become scratched, sample trays may stain and dust may impact image quality. Laboratories should track illumination, check trays and filters, take backups of acquisition protocols, carefully update software and maintain documentation of upkeep.

When the image quality is not good, go through the entire process and see if there is a problem with the camera or the rest of the chain. This could be caused by the stain, the sample or the substrate, the exposure settings, the light source or the filter.

結論

The most useful platform isn't always the one that has the most features. It is the one that offers the right illumination, sensitivity, dynamic range, software, imaging area and workflow that other users are able to reproduce.

Its good imaging starts from the sample preparation stage. The instrument records the experiment, but, if the preparation of the assay is carefully done and the acquisition is done repeatedly, then the image (record) is meaningful.

よくある質問

Q1. What can a Molecular Biology Imaging System Capture?

It is able to capture DNA and RNA gels, protein gels, chemiluminescent western blots, fluorescent western blots, and colorimetric membranes depending on the settings.

Q2. What is the difference between a Gel Documentation System and a Western Blot Imager?

Not always. The basic gel system may only support imaging with UV, blue and white light imaging, and Western blot imagers may require sensitive chemiluminescence or multichannel fluorescence detection.

Q3. Why is dynamic range important?Why dynamic range is important?

A large dynamic range of signals will allow the capture of the weak and strong ones without saturation of the strongest. This is particularly true of quantitative analysis.

Q4. Can Automatic Exposure be trusted?

It can be helpful to determine a starting exposure range. The operator should also observe other factors such as saturation, background, weak signals and imaging mode.

Q5. What is the best Imaging Mode?

The mode that is used is dependent on the sample, stain, label and analysis objective. The light source, filter and camera settings are dependent on the assay.